
How to Create a Recent Sales Notification on Your Website (for Free)
If you've ever landed on a website and seen a little popup in the corner saying "Someone from New York just made a purchase" - that's a sales notification. And it works. Seeing that other real people are buying something is often the nudge a hesitant visitor needs to pull the trigger.
The best part is that you don't need an expensive tool to add one to your site - and you don't need to write any code either. I've already built the whole thing for you. I'll walk you through deploying it to your website in about 5 minutes.
What you'll need
Before we start, make sure you have these three things - all of them are free:
That's it. No server to manage, no monthly subscription, no code to write from scratch.
How it works
Here's the simple version: you'll deploy a small backend to Vercel that talks to your Stripe account and fetches your latest successful purchases. Then a lightweight JavaScript snippet on your website calls that backend and displays the popup.
Your Stripe secret key stays safely locked inside Vercel's environment variables - it never touches your website's source code.
    Your website
      │
      └─ loads popup.js (from your Vercel deployment)
          │
          └─ fetches /api/purchases
              │
              └─ calls Stripe API (your secret key, stored securely in Vercel)
                  │
                  └─ returns latest successful charges → popup displays
Step 1 - Fork the repo and deploy to Vercel
I've put together the complete source code on GitHub. You don't need to write a single line - just fork it and deploy.
👉 github.com/bkrisa/sales-popup
The repo contains 5 files:
- api/purchases.js - the Vercel serverless function that fetches your Stripe data
- popup.js - the popup logic that runs in your visitor's browser
- popup.css - the styles
- vercel.json - routing and CORS config
- README.md - this tutorial in condensed form
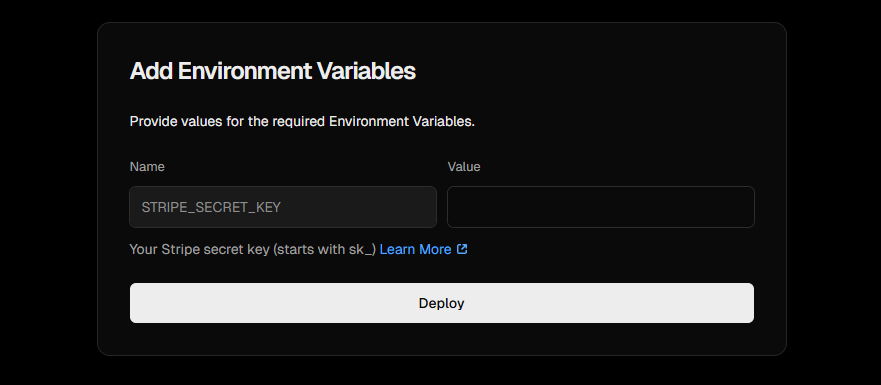
Once you've forked it, click the Deploy to Vercel button in the README. Vercel will walk you through the setup - the only thing it'll ask for is your STRIPE_SECRET_KEY.
Getting your Stripe secret key (restricted)
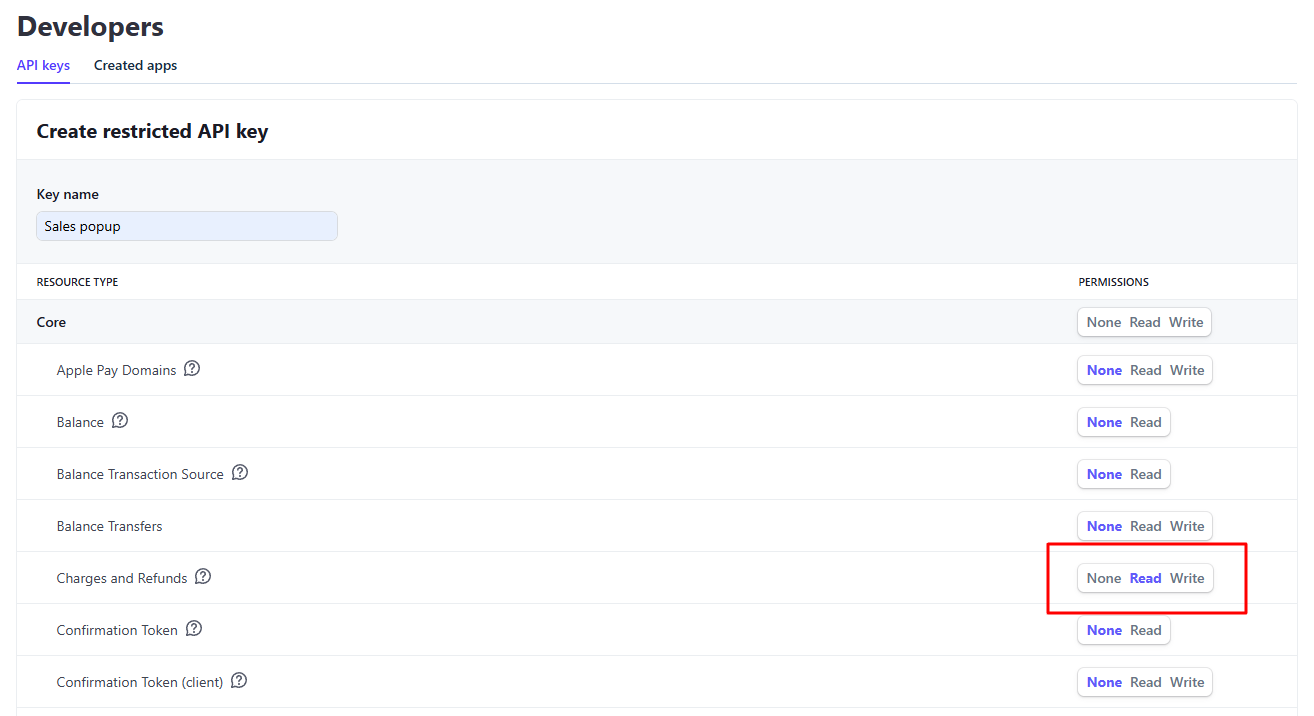
Don't use your main Stripe secret key. Instead, create a restricted key that only has read access to charges - this is safer and follows the principle of least privilege.
Here's exactly where to find it:
Stripe Dashboard → Developers → Manage API keys → Create restricted key → Building your own integration
Fill in the form like this:
- Key name: Sales Popup (or anything you like)
- Charges and Refunds: Read
Then click Create key and copy the key it generates (starts with sk_live_ or sk_test_). Paste this into Vercel when it asks for STRIPE_SECRET_KEY.
After deployment, Vercel gives you a URL like:
https://your-project-name.vercel.appKeep this URL - you'll need it in the next step.
Step 2 - Add the script to your website
This is the easiest part. Paste this one line of code before the
closing </head> tag on any page where you want the
popup to appear:
<script src="https://your-project-name.vercel.app/popup.js" async defer></script>Just replace your-project-name with your actual Vercel URL.
Not sure where to paste it? Here's how to do it on the most common platforms:
- WordPress:
Install the free Insert Headers and Footers plugin. Go to Settings → Insert Headers and Footers → Scripts in Footer and paste the script tag there.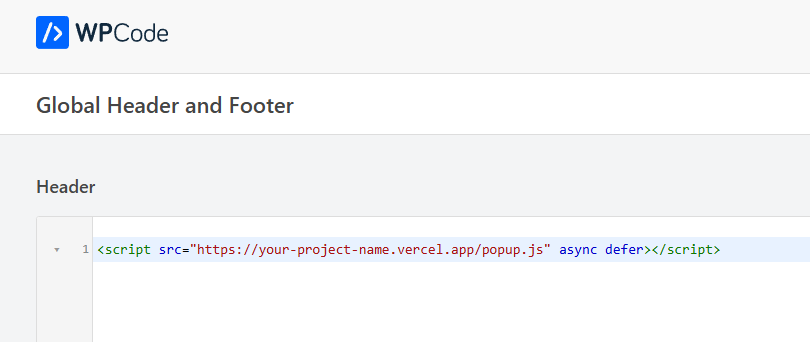
- Webflow:
Go to Project Settings → Custom Code → Footer Code, paste the script, and publish your site. - Framer:
Go to Site Settings → General → Custom Code → End of<body>tag and paste it there. - Squarespace:
Go to Settings → Advanced → Code Injection → Footer.
Once the script is live, visit your website - the popup should appear within a few seconds (there's a 3-second initial delay by default so it doesn't feel aggressive).
Step 3 - Customise the popup (optional)
The popup works out of the box, but you can tweak pretty much everything. Open popup.js and find the CONFIG block at the very top of the file:
    const CONFIG = {
      position: 'bottom-left',   // bottom-left | bottom-right | top-left | top-right
      hideMobile: true,          // hide on screens smaller than 768px
      customerPrefix: 'Someone',
      actionText: 'made a purchase',
      initialDelay: 3000,        // wait 3 seconds before showing the first popup
      duration: 7000,            // each popup stays visible for 7 seconds
      enableLoop: false,         // set to true to keep cycling through purchases
      bgColor: '#ffffff',
      textColor: '#64748b',
      highlightColor: '#008cff',
      borderColor: '#e5e7eb',
      borderRadius: '10px',
    };
Change anything you want, commit the file to GitHub, and Vercel will automatically redeploy in about 30 seconds.
Frequently asked questions
1. Is the purchase data real?
Yes. It's pulled directly from your Stripe account. Only successful (status: succeeded) charges are shown - no fake data.
2. Will it slow down my website?
No. The script loads asynchronously, so it has zero impact on your page load time or Core Web Vitals.
3. What data does it show about buyers?
Only the country, city, and timestamp of the purchase. No names, emails, or payment details are ever accessed or displayed.
4. What if I don't have many sales yet?
Even a handful of real purchases can make a significant difference. The popup works with whatever you have.
Want more without the DIY work?
The free version above is a great starting point, but it has some limitations. Here's what you're missing compared to the full SalesPup:
- Verified proof pages. Every popup in SalesPup links to a dedicated page that independently confirms the purchase really happened in Stripe. Skeptical visitors can click through and verify it themselves - which is a significant trust boost that the DIY version simply can't replicate.
- Visual dashboard. Instead of editing a config file and pushing to GitHub every time you want to change the popup text or colors, SalesPup gives you a point-and-click dashboard. Change position, colors, delay, and copy without touching any code.
- Multi-site support. The Pro plan ($69 one-time) lets you run the popup on unlimited websites from a single account - no separate deployment for each project.
- No infrastructure to manage. With the DIY version, you're responsible for your Vercel deployment. If Vercel changes something or your deployment breaks, you're on your own. SalesPup handles everything.
- SalesPup is a one-time payment - $49 for one site, $69 for unlimited sites. No subscriptions, no monthly fees. If the DIY setup feels like more work than it's worth, it might be worth the $49 to just have it done.
Questions or issues with the setup? The GitHub repo has a full README, and you can open an issue there if something doesn't work.